My intention with this 2-part series is to dispel the complexities about GitHub. Create a simple test program, commit and push it to GitHub, while preparing to launch an Azure Web App for our small program that we are pushing to GitHub. But why stop there? In the second part of the series, we are going to run the GitHub code we pushed in series 1 on Azure via CI/CD pipeline.
GitHub offers a rich set of features and functions for automating the software development life cycle.
Setup GitHub Repository
We will be using a Node.js application for this demonstration. But the concepts we use will be applicable for other languages and frameworks like Python, Go, Ruby on Rails, etc.
Follow this two-step procedure to create the application and push it to a repository in GitHub.
Step #1: Create the Node.js application
In your preferred text editor, create a file index.js with this content. I used Visual Studio Code, but you can use the editor you want. Some other great editors out there are Sublime Test, Atom or NotePad++.
const http = require('http')
const server = http.createServer(function (req, res) {
  res.end(`Here's your coffee. Pura Vida\n`)
})
server.listen(8080, function () {
  console.log(`listening on 8080`)
})
This is a bare-bones Node.js application that will keep listening on port 8080 and respond with Here's your coffee. when an HTTP request is received. This is quite enough for our demonstration of the CI/CD pipeline.
Microsoft Windows [Version 10.0.19042.867]
(c) 2020 Microsoft Corporation. All rights reserved.

C:\Users\migue>cd C:\Users\migue\test

C:\Users\migue\test>node index.js
listening on 8080
Also, note that we are not using any Node.js frameworks such as Express. So, we do not have any dependencies for external npm packages. Therefore, we do not need the packages.json file that is usually included with Node.js applications.
Step #2: Upload Node.js application to GitHub
If you don't have a GitHub profile, go to GitHub and create one. Then, sign in to your GitHub account and create a new public repository named espresso-test.
Open either PowerShell or Terminal in your computer and go to the root path of the Node.js application. This is where you have saved the index.js file above. Using the commands below, initialize a new Git repository and push the code to the espresso-test repository that you just created in GitHub. Make sure to replace the user_name with your username in GitHub.
echo "# Espresso-Test" >> README.md
git init
git add README.md
git commit -m "first commit"
git branch -M main
git remote add origin https://github.com/mgguevara10/Espresso-Test.git
git push -u origin main
Setup Azure Web App
Now, follow these steps to set up the Web App service in Azure.
Step #1: Initialize app
If you don't have an account in Azure, go to Azure Portal and create an account.
Once signed in to the Azure Portal, click on Create a resource in the upper menu and select Web App from the list of services. If you don't see the option Web App, type web app in the search box to get it.
Alternatively, you can type App Services in the top search bar and select App Services. Then, click on Create menu to initialize a web app.
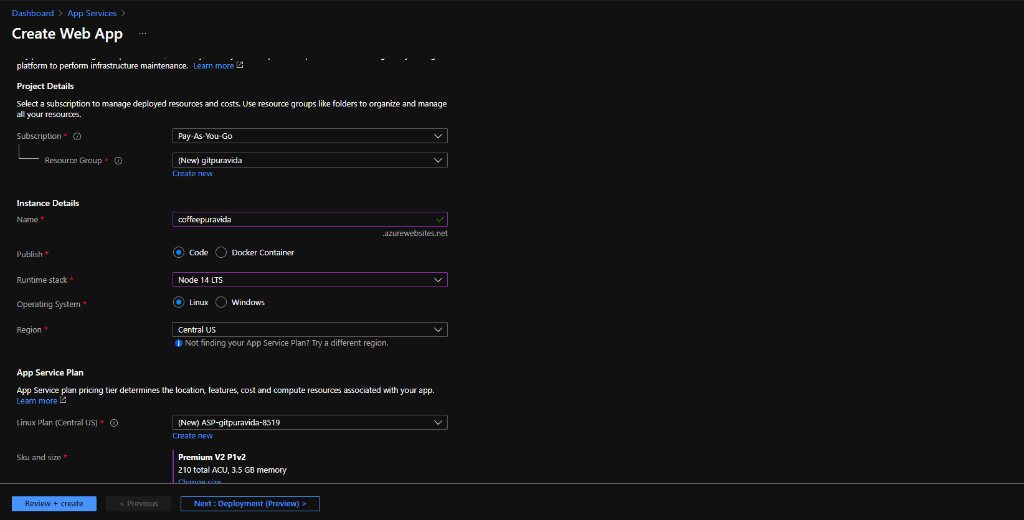
Step #2: Fill in the details of the Web App
Complete the form fields as described below.
Subscription and Resource Group: Leave the default for the subscription and create a new resource group if one is not created already. These two parameters are used for billing purposes.
Name: Give a unique name for your web app.
Publish: Select the option code as we will publish the code without building a container image.
Runtime Stack: Select Node 14 LTS.
Operating System: Select Linux.
Region: Select your preferred region. We have selected Central US, but yours could be different.
Linux Plan: Under App Service Plan, leave the default for Linux Plan.
SKU and size: This parameter defines the price and the scale of the web app. Azure provides several pricing options for Web Apps. For the time being we'll choose the free plan for this app. You can change this later, if required. Click on Change size and select F1 under Dev/Test and click Apply.
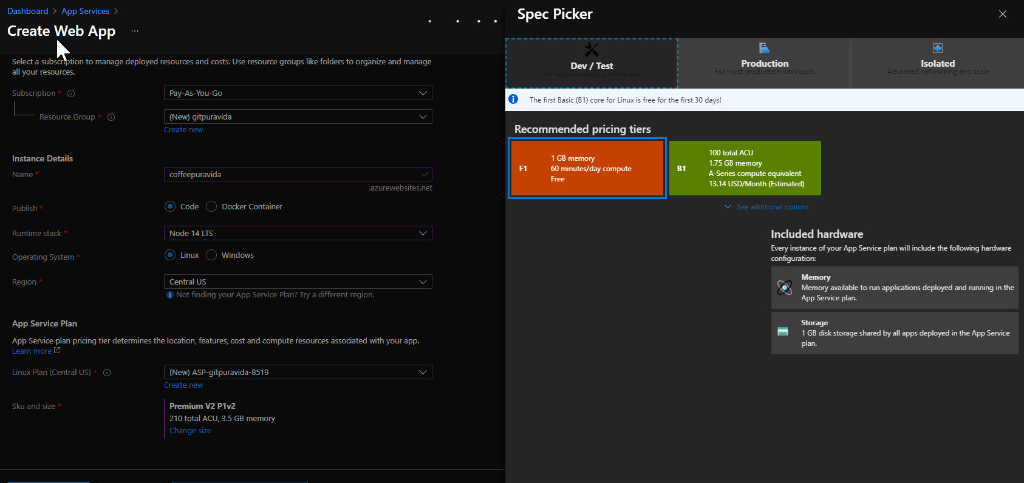
Click on the Review + Create button at the bottom left.
If any parameter is not OK, Azure will give a warning, so you can check and correct it. If everything is OK, you can click the Create button at the bottom and Azure will set up the Web App.
Azure will take about one minute to complete the process. After the application is created, follow steps #3 and #4 to obtain the authorization credentials for GitHub.
Step #3: Set environment variables
The newly created application will be displayed on the home page of your Azure Portal. Click on it to go to the detailed view. Then, click on Configuration in the left menu, then on Application Settings on the top menu. Click on New application setting to add a new variable.
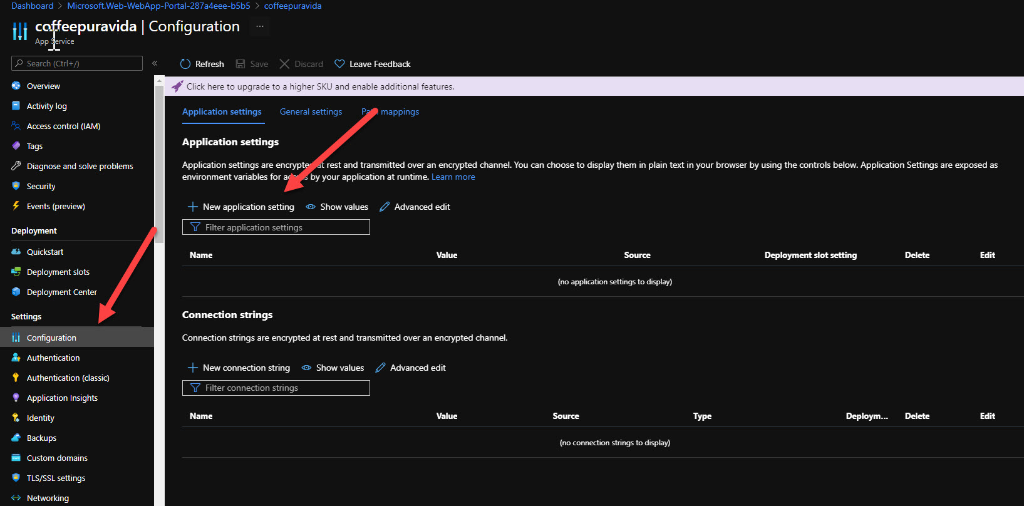
In the Dialog box that appears, fill in the Name as WEBSITE_WEBDEPLOY_USE_SCM and value as True and click OK. Then, click the Save button. You will be prompted that the application will be restarted. Since our application is not yet operational, let's go ahead and restart.
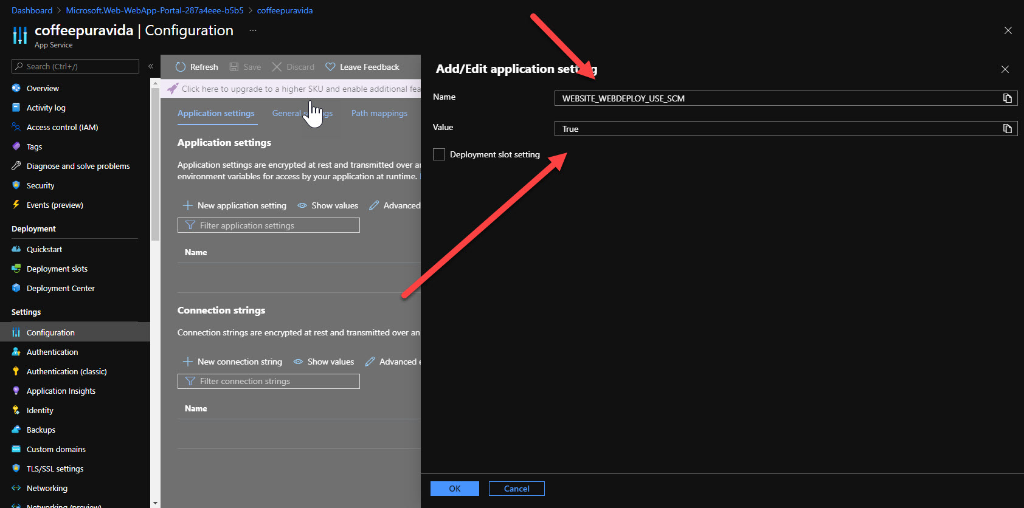
Step #4: Generate deployment credentials
After setting the environment variable described above, go to the application page and click on Get Publish profile. You will be prompted for a file download, and the credentials will be saved to a file named .PublishSettings.
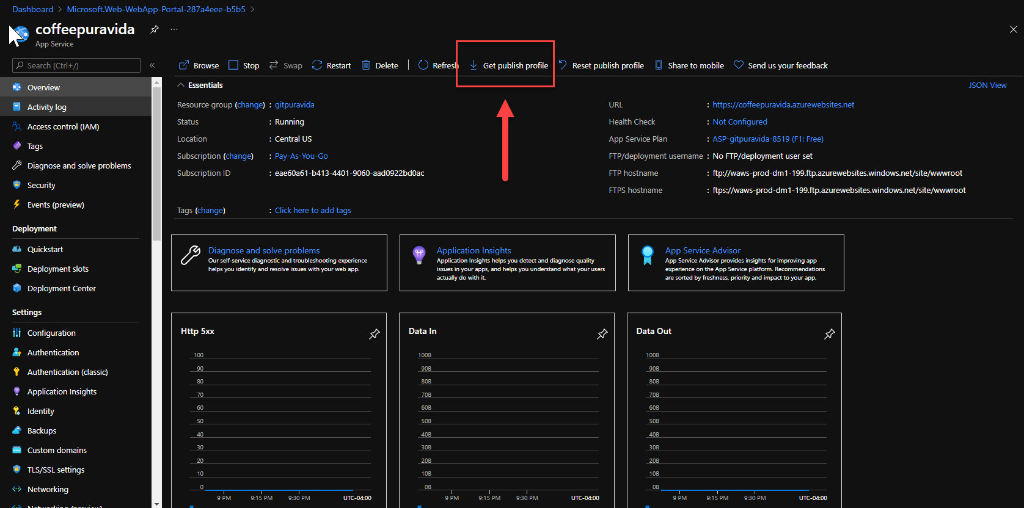
These are the credentials for GitHub to deploy the code to Azure. We will use these credentials in the next section.
Conclusion
I have split this blog into 2 parts so that if anyone is following along they won't feel overwhelmed. In part 2 we will demonstrate how to implement a CI/CD pipeline with GitHub Actions to deploy a web app to Azure. While we will use a web app for this demonstration, GitHub Actions is not limited to that. You can use GitHub Actions to implement sophisticated CI/CD pipelines for deploying applications on Azure VMs, containers, and even Azure Functions.